Node-REDで温度などの時系列データをCSVファイルに保存する
はじめに
今回はTibbo-Piを使用して、温度や照度を取得します。
Node-REDを使い、そのデータを時系列でCSVファイルに保存していきます。
例えば、そのローカルに保存したCSVファイルをクラウド(Dropboxなど)へアップすると、
遠隔やスマホからデータを確認したり、ユーザと共有したりすることができます。
記事参考:Node-REDでCSVファイルをDropboxで共有する
温度情報をCSVファイルに保存する
まずはTibbo-Piから温度の情報を取得し、時系列にCSVファイルを保存します。
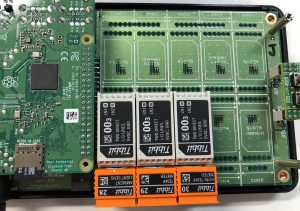
Tibbo-Piに温度センサー(#29)を設置します。
Node-REDで温度情報が取れるか、まずは確認してみましょう。
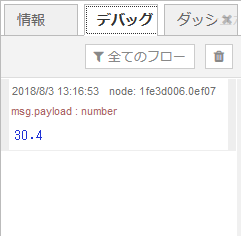
以下のようにデバッグタブに温度を出力するようにしてみます。
injectノードをクリックすると、デバッグタブに温度が表示されます。
この情報をCSV出力してみます。
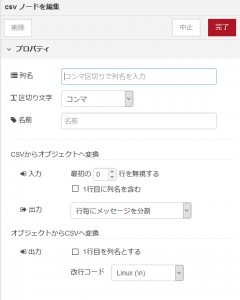
CSVノードを配置します。
設定はそのままにします。
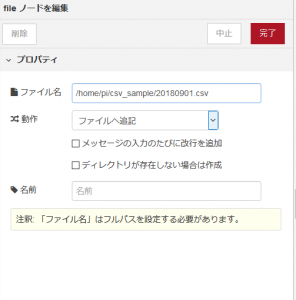
次にfileノードを使用します。
設定は以下のようにしました。
ファイル名は可変でも指定はできますが、ここでは固定で設定しました。(後述)
また、「メッセージの入力のたびに改行を追加」のチェックを外します。
フロー全体は以下のような感じです。
functionノードも使用し、CSVのデータに日付を追加します。
CSVデータ作成というfunctionノードの中身は以下になります。
現在日付を追加しているだけです。
|
1 2 3 4 5 6 7 8 9 10 11 12 13 14 15 16 17 |
var now = new Date(); var nowStr = "" + now.getFullYear() + "/" + ('0' + (now.getMonth() + 1)).slice(-2) + "/" + ('0' + now.getDate()).slice(-2) + " " + ('0' + now.getHours()).slice(-2) + ":" + ('0' + now.getMinutes()).slice(-2) + ":" + ('0' + now.getSeconds()).slice(-2); msg.payload = { // 日付 date: nowStr, // 温度 temp:msg.payload } return msg; |
これで完成です。実行してみましょう。
以下のファイルが作成され、中身は「日付」「温度」のようになっていることを確認してください。
クリックするたびにデータが追記されていきます。
/home/pi/csv_sample/20180901.csv
複数のセンサー情報を取得する方法
今度は、温度と照度、湿度のデータを同時に3つ取得し、時系列にCSVに出力します。
まずはTibbo-Piに、#28 照度センサ、#29 温度センサ、#30 温度/湿度センサを配置します。
Node-REDで、3つのデータが揃ったら、1行のCSVを出力します。
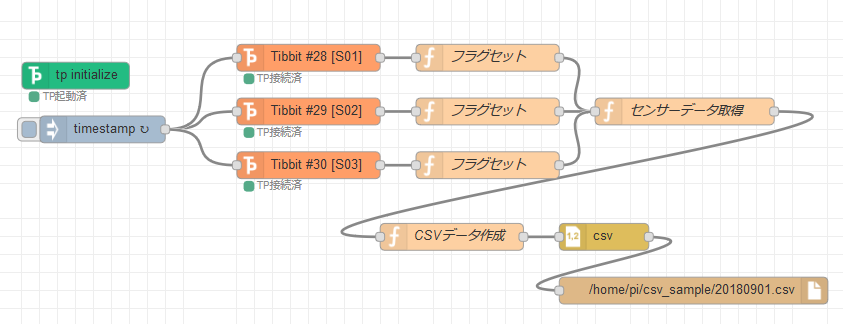
Node-REDのノードはこのように配置します。
詳しくは、最後にフローをjsonで公開していますので、読み込んで確認してください。
各センサーのデータを取得し、すべてのデータが揃った場合に、CSVデータ作成へ進みます。
フラグセット
|
1 2 |
msg.num = 1; return msg; |
|
1 2 |
msg.num = 2; return msg; |
|
1 2 |
msg.num = 3; return msg; |
センサーデータ取得
|
1 2 3 4 5 6 7 8 9 10 11 12 13 14 15 16 17 18 19 20 21 22 23 24 25 26 27 28 29 30 31 32 |
var light = context.get("ctx_light")||""; var temp = context.get("ctx_temp")||""; var humd = context.get("ctx_humd")||""; if(msg.num === 1){ light = msg.payload; }else if(msg.num === 2){ temp = msg.payload; }else if(msg.num === 3){ humd = msg.payload.humd; } if(light !== "" && temp !== "" && humd !== ""){ msg.payload = { temp: temp, light: light, humd: humd }; context.set("ctx_light",""); context.set("ctx_temp",""); context.set("ctx_humd",""); return msg; }else{ context.set("ctx_light", light); context.set("ctx_temp", temp); context.set("ctx_humd", humd); return null; } |
CSVデータ作成
|
1 2 3 4 5 6 7 8 9 10 11 12 13 14 15 16 17 18 19 20 21 |
var now = new Date(); var nowStr = "" + now.getFullYear() + "/" + ('0' + (now.getMonth() + 1)).slice(-2) + "/" + ('0' + now.getDate()).slice(-2) + " " + ('0' + now.getHours()).slice(-2) + ":" + ('0' + now.getMinutes()).slice(-2) + ":" + ('0' + now.getSeconds()).slice(-2); msg.payload = { // 日付 date: nowStr, // 温度 temp:msg.payload.temp, // 湿度 humd:msg.payload.humd, // 照度 light:msg.payload.light } return msg; |
実行すると、先程同様にCSVデータが出力されます。
出力されたCSVファイルをエクセルで開いてみました。
左から順に、日付、温度、湿度、照度の順で出力されています。
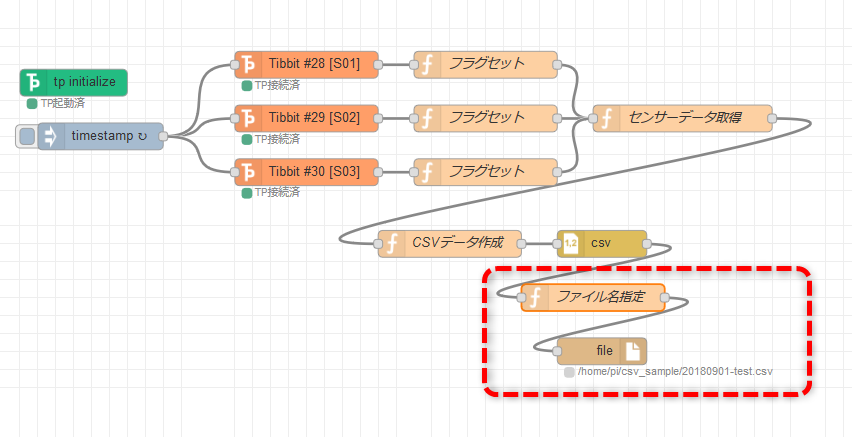
CSVファイル名を動的に変えたい場合は、functionノードを使用しましょう。
以下のように指定します。もちろん、日付をファイル名にすることも可能かと思います。
(fileノードで設定した「ファイル名」は空白にします)
|
1 2 |
msg.filename = '/home/pi/csv_sample/20180901-test.csv'; return msg; |
フロー
|
1 |
[{"id":"60e04e8f.e32678","type":"tp-initialize","z":"756369ef.692528","name":"","make":"true","x":140,"y":560,"wires":[]},{"id":"5733eccd.906144","type":"Tibbit-#29","z":"756369ef.692528","name":"","tpSlot":"S02","communication":"I2C","connectedStatus":"start","host":"","x":400,"y":600,"wires":[["e1955500.c25f18"]]},{"id":"1f1ba4b3.2ee613","type":"csv","z":"756369ef.692528","name":"","sep":",","hdrin":"","hdrout":false,"multi":"one","ret":"\\n","temp":"","skip":"0","x":730,"y":740,"wires":[["aa11c4f2.2a9e08"]]},{"id":"aa11c4f2.2a9e08","type":"file","z":"756369ef.692528","name":"","filename":"/home/pi/csv_sample/20180901.csv","appendNewline":false,"createDir":false,"overwriteFile":"false","x":830,"y":800,"wires":[]},{"id":"c626f1ff.b26928","type":"function","z":"756369ef.692528","name":"CSVデータ作成","func":"var now = new Date();\nvar nowStr = \n \"\" + now.getFullYear() + \n \"/\" + ('0' + (now.getMonth() + 1)).slice(-2) + \n\t\"/\" + ('0' + now.getDate()).slice(-2) + \n\t\" \" + ('0' + now.getHours()).slice(-2) + \n\t\":\" + ('0' + now.getMinutes()).slice(-2) + \n\t\":\" + ('0' + now.getSeconds()).slice(-2);\n\nmsg.payload = {\n // 日付\n date: nowStr,\n // 温度\n temp:msg.payload.temp,\n // 湿度\n humd:msg.payload.humd,\n // 照度\n light:msg.payload.light\n}\n\nreturn msg;\n","outputs":1,"noerr":0,"x":560,"y":740,"wires":[["1f1ba4b3.2ee613"]]},{"id":"317d2221.d7de2e","type":"Tibbit-#28","z":"756369ef.692528","name":"","tpSlot":"S01","communication":"I2C","connectedStatus":"start","host":"","x":400,"y":540,"wires":[["fee1b120.ae6148"]]},{"id":"98fb06e7.3aa1","type":"Tibbit-#30","z":"756369ef.692528","name":"","tpSlot":"S03","communication":"I2C","connectedStatus":"start","host":"","x":400,"y":660,"wires":[["99a21d2d.e863d8"]]},{"id":"53b7f6e4.43011","type":"function","z":"756369ef.692528","name":"センサーデータ取得","func":"var light = context.get(\"ctx_light\")||\"\";\nvar temp = context.get(\"ctx_temp\")||\"\";\nvar humd = context.get(\"ctx_humd\")||\"\";\n\nif(msg.num === 1){\n light = msg.payload;\n}else if(msg.num === 2){\n temp = msg.payload;\n}else if(msg.num === 3){\n humd = msg.payload.humd;\n}\n\nif(light !== \"\" && temp !== \"\" && humd !== \"\"){\n msg.payload = {\n temp: temp, \n light: light, \n humd: humd\n };\n \n context.set(\"ctx_light\",\"\");\n context.set(\"ctx_temp\",\"\");\n context.set(\"ctx_humd\",\"\");\n return msg;\n \n}else{\n \n context.set(\"ctx_light\", light);\n context.set(\"ctx_temp\", temp);\n context.set(\"ctx_humd\", humd);\n return null;\n \n}","outputs":1,"noerr":0,"x":820,"y":600,"wires":[["c626f1ff.b26928"]]},{"id":"fee1b120.ae6148","type":"function","z":"756369ef.692528","name":"フラグセット","func":"\nmsg.num = 1;\nreturn msg;","outputs":1,"noerr":0,"x":600,"y":540,"wires":[["53b7f6e4.43011"]]},{"id":"e1955500.c25f18","type":"function","z":"756369ef.692528","name":"フラグセット","func":"\nmsg.num = 2;\nreturn msg;","outputs":1,"noerr":0,"x":600,"y":600,"wires":[["53b7f6e4.43011"]]},{"id":"99a21d2d.e863d8","type":"function","z":"756369ef.692528","name":"フラグセット","func":"\nmsg.num = 3;\nreturn msg;","outputs":1,"noerr":0,"x":600,"y":660,"wires":[["53b7f6e4.43011"]]},{"id":"785818c0.e1a278","type":"inject","z":"756369ef.692528","name":"","topic":"","payload":"","payloadType":"date","repeat":"60","crontab":"","once":false,"onceDelay":0.1,"x":170,"y":620,"wires":[["5733eccd.906144","317d2221.d7de2e","98fb06e7.3aa1"]]}] |
補足
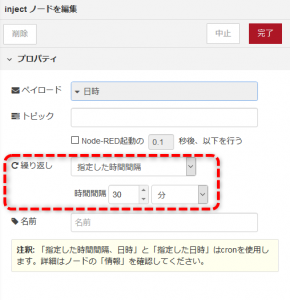
injectノードの繰り返しの設定を行うと定期的に出力することができます。
 Tibbo-Pi 販売終了のお知らせ

